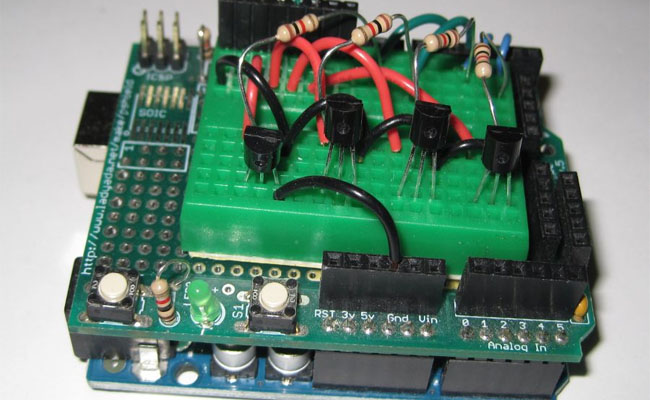
This Arduino Air Swimmer Shark Mod is credited to a member from shallowsky.
 There were two possible approaches. First, mount an Arduino directly on the shark, and let it be totally self-directed. Second, patch the Arduino into the shark’s transmitter and control it from Linux. I chose the second option, for several reasons. First, I was fairly sure it would be easier, and less invasive (the shark would still be usable with manual control). I also liked the idea of keeping the transmitter as a manual override, in case my control program didn’t work right. Finally, I liked the idea of keeping a Linux machine in the loop — the shark would actually be controlled by Linux, not just by the Arduino.
Arduino Air Swimmer Shark Transmitter Hack
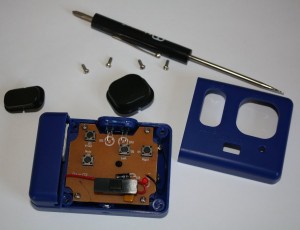
 So the first thing I did was take the transmitter apart (4 Philips screws). Inside are 4 pushbuttons, for right, left, up, and down, and the circuit board is nice and simple. Whew — this might be doable!
Four more screws and I had access to the back of the board, which was equally simple. Now I could get my voltmeter on the contacts while I pushed buttons.
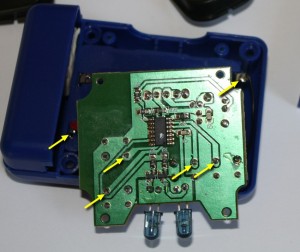
It turned out the contacts (indicated with arrows on the photo) on the downstream side of each switch were normally high (4.5 volts — the transmitter uses 3 AAA batteries). When I pushed the button, the contact went to ground. Okay, so what I needed was some way for the Arduino to ground those contacts at will.
First I needed to solder some wires to the contacts. (How do you tell which side of the pushbutton is the one you need to solder? Well, one side changes voltage when you press the button, and the other side stays constant. The one that changes is the one you need to connect to the Arduino, so the Arduino can change it too.)
I figured I needed 6 wires: ground, power, and one for each switch. (It turned out I didn’t need the power wire, but I figured it didn’t hurt to include it just in case.) I wanted to have a nice small connector on the side of the transmitter, but I couldn’t find any 6-pin connectors that didn’t look big and bulky, so I gave up and decided I’d just let my ribbon cable dangle from the transmitter. If I got a nice multi-colored one, maybe it would look festive.
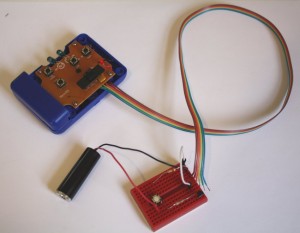
I couldn’t find any 6-conductor ribbon cable, so I got a wider one and separated 6 wires from the rest. Then I soldered the six wires to the appropriate places (marked by arrows in the photo). On the other end, I tinned the six wires with solder so I could plug the stranded wires into my breadboard.
Arduino Air Swimmer Shark Simulation
I’ve done enough reading to know of three ways to simulate a button press. You can put a relay between the two contacts of the switch; you can do the same thing, but with an optocoupler (opto-isolator) instead of a relay; or you can do some magic with a transistor. I was fuzzy on the transistor magic bit, so a relay sounded easiest.
I played around with a relay and a spare switch and convinced myself I knew how to wire them up. Then it was off to my local parts store to buy four matched relays small enough to fit on my little mini breadboard.
 There followed a several-day fiasco wherein I bought lots of relays that turned out not to be suitable, and got increasingly frustrated at how large and clunky all the available relays were. There are smaller ones, but I couldn’t get them to work. And I learned that relays mostly come without documentation on which pin does which, so there’s a lot of experimenting with each new type.
Frustrated, I tried some optocouplers I’d bought on a whim last year. No dice … couldn’t get them to work either.
Desperate, I turned to IRC, #arduino on Freenode. The folks there are mostly electronics wizards, and I’m sure my questions must have seemed very dumb, but they were patient with me, and pointed me toward a very simple circuit, LED4dummies, that was just what I needed. (They also suggested Wikipedia’s Open collector article, but I found that less clear.)
It took me some experimenting with a transistor, an LED and a couple of resistors (I blew out a couple of transistors before I realized I had the R2 resistor in the wrong place) but eventually I got it working, and felt confident enough to try it with the real shark transmitter. The key was to simplify the circuit so it had no extra parts, then once it was working, add more parts to build it up to what I needed.
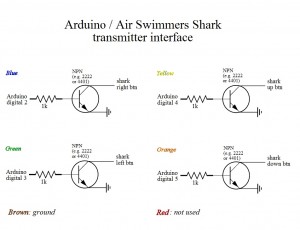 At left, the circuit I ended up with. For each button, I have one transistor and one resistor (I don’t need the second resistor from the LED4dummies circuit, since that was just to keep the LED from burning out).
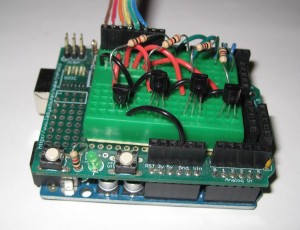
Above is the circuit assembled on a mini-breadboard on top of the proto-shield. Note that the ends of the ribbon cable are plugged in to a spare header I had lying around; a header makes a passable connector, so I can plug it in fairly easily right before a talk. The green and blue wires in the back are going to Arduino digital output pins 3 through 6 (leaving 0 and 1 for serial I/O). The red wires go from the transistors back to the ribbon cable wires that go to the Arduino Air Swimmer Shark transmitter buttons.
Arduino Air Swimmer Shark Software
Now I could make the Arduino Air Swimmer Shark think I’d pressed a button on its transmitter. How do I control that from Linux?
On the Arduino side, I wrote a simple program that reads and parses commands coming over the USB cable. So from the computer, I might send a line like L 300, and the Arduino would “press” the Left button for 300 milliseconds. I had already written something like this for a couple of other Arduino programs. That program is shark.pde.
On the Linux side, first I needed something that established a serial connection and sent commands to the Arduino. I wrote a Python class for that, shark.py. That let me send commands from the Python console to test the shark.
Then I needed something more visual, something I could show during a talk. In particular, the Arduino Air Swimmer Shark doesn’t swim unless someone’s pressing left, right, left, right buttons over and over. Of course I wanted the computer to handle that part.
So I wrote a little Python-GTK application that keeps the Arduino Air Swimmer Shark swimming, and lets me drag a mouse around to adjust its left/right up/down direction: sharkwindow.
Hope you enjoy your Arduino Air Swimmer Shark
